
|
STORE
HOURS
9 TO 6 CDT GMT minus 5 hours Monday thru Friday Do not call on Sat. Sun. please |

We offer a full line of damper felt, with or without
the wooden moldings attached.
We also offer Damper Levers and repair springs and flanges
for uprights.
Go here for Grand Piano damper parts.
Brass Damper Flange repairs are available.
![]()
Damper Instruction
When you strike a key in the middle or bass, and when you let it up, if it keeps ringing on, you probably have a damper problem.
First, in all styles of uprights, look down into the action. Is a white damper felt missing? If so, look in the bottom of the piano. It may have fallen down there when it came off. Put Elmer's carpenter's glue on the spot that came loose, and slide the white felt down into place. Use the damper itself as a pressure clamp to hold the white felt in place against the string. Don't play it for an hour. How's that for an easy repair?
When you look down into your upright from above, and all of the dampers have their felt, but one of them is floppy (the one that rings on after you let up on the key) you have a pretty hairy problem, but let's try. First take out the action as instructed in Chapter Five, and stand it up leaning against something so that the dampers are toward you.
Check the wire spring, about one inch long, that pushes on the damper from behind. If it is out of place, help it back into its groove like the dampers near it. That may be the only problem if the damper now returns by itself after you push on it.
If the spring embedded in the damper flange is broken, you will need to order a damper flange. Find this in the Online Catalog where the Upright Action Parts are. If the flange if broken, order from the same page. If you have a Steinway upright, the brass clip at the hinge point of the flange may be broken or missing. We can supple the clip at our Upright Action Parts section.
The damper itself may be broken. You may be able to improvise a repair, but not likely. See Upright Action Parts for damper levers.
To put the new flange on the damper, you will need to slide the center pin out of the red bushings in which it turns. Do this with a flat nosed rod or tool of some sort and push the pin through. Do not get into the red felt bushing and damage it. You will have to remove the center pin completely from the old flange.
If you are reusing the old pin, gently work it into the bushing of the new flange, either side, but you must not push the red felt bushing out of its hole. You may do a little filing on the end of the center pin to round it, but not much.
If you have purchased a center pin from out Catalog, from the Center Pin Page, you can take the old center pin clear out.
Whether using a new or old pin, work it into the red bushing gently, and stop before the center pin enters the opening in the flange. With the pin started, put the damper in place in the hollow recess in the flange, and slowly work the point of the hinge pin through the hole in the wood of the damper.
Keep working the pin through until it comes out of the other side of the flange and through the second red felt bushing. Be careful not to push the bushing out.
If you are using a new center pin, once it is through, push it as far as possible from the back end of the pin, and, with diagonal clippers, cut off all of the pin that you can that hangs out the other side. Don't worry if a little hangs out. It will not cause a problem.
Do you have dampers with brass hinge clips on the damper lever, such as Knabe or Steinway? Do not remove the center pin on the new flange, or from the old one if the flange is good. You will only need to attach the damper lever to the center pin by setting the brass clip over the center pin and tightening the small screw. Make very sure that the brass clip is grooved exactly the same as the old one so that the center pin will not by bound up when you tighten the brass clip.
Put the damper back in its place in the action with the wood screw, and install the action.
What do you do in an emergency where a damper is broken in the middle of the piano? Take the last damper on the treble end of the damper set, and move it to replace the one in the middle that is driving you nuts. You will not make much difference in the sound of the piano because the higher notes fade so quickly anyway. PLEASE, save the damaged damper so that you can send it to us to be duplicated, or for your tuner to replace later.
![]()
Replacing Damper Felts-- Upright Pianos
You cannot improvise here. You must order new damper felts. Once they are in hand, remove the action as per instructions in Chapter Five. Set the action on a work table. Here are the steps:
1. Remove the old felt with a razor knife. Be sure to leave behind the flat wood board which the felts mount to.
2. What do I do about the wedge shaped felts at the left end of the treble section? If you are doing only the treble, which often is the only felt which is bad, you may have some wedge type felts in the middle just before the "break" over into the bass area. Simply replace them with the flat block type felts. If you don't have enough to do all of them with the wedges, then leave the wedges alone. They usually will get by all right for a while. In any case most of our damper felt sets come with a strip of double wedge felt from which you can cut damper felts for these notes.
3. With Elmer's carpenter's glue, glue the new felts onto the dampers. You may want to lay the action VERY CAREFULLY on its back (technically its front) with the damper boards up. This way, the felts will stay put. If the damper felts are cut with a graduating size, be sure you put the larger felts on the lowers notes in the treble scale. Bass dampers may also be graduated, so follow the same logical rule.
4. Trick-- I like to glue the new felts on with the action back in the piano. I put a generous dab of glue on the felt piece, then I lift the damper head back, and I slip the new felt quickly into place. Then I let the damper head and wooden board or block come down on the new felt piece, and the damper lever acts as a sort of clamp to keep the new felt in place as it dries. If you can juggle the thing this way, it will be better work in the end. The only exception would be on uprights which have two damper felt pieces on each damper board. This kind will have to be done out of the piano.
Replacing Damper Felts-- Grand Pianos
Grand dampers are somewhat tedious to replace, but many of my customers are doing it with good results.
I have dropped the diagram of the damper action here from my Diagram Section. Study the diagram below carefully.
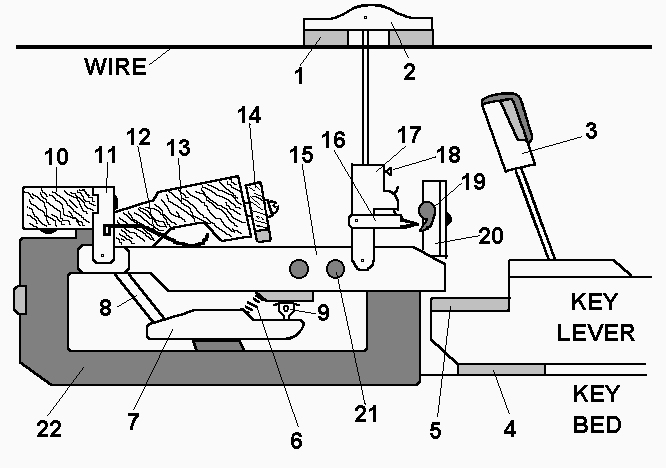
You want to replace part number 1. The damper has a wire which is mounted in the wooden head of the damper on top and which goes down into the damper action which is hidden inside the action cavity. You will have to remove the vertical damper wire from part 17 by loosening screw 18. To do this, you will need to remove the action from the piano as instructed in Chapter Five.
Once you have the action out of the piano, you may loosen the screw holding the wire in place in 17. The problem is, the damper underlever, part 15, will drop, and you will not know where to set it later so that the back end of the key lever can come under the front of the underlever without jamming it.
You need to improvise something here. Measure the distance between the front end of the underlever, part 15, and the bed of the action area. Then go find some stick, or cut a piece of wood, which will just fit snug under the end of all of the underlevers-- 15. Slide this into place, while lifting the underlevers out of the way, and it will hold the underlevers in the correct position after the damper wires are removed.
Now, loosen the screws (18) in Part 17 which hold the damper wires, and remove the dampers one by one. Number the side of each damper from left to right in order.
Once you have the dampers out, use a razor knife to remove the old damper felts. If you are using new damper felts which do not have the scarlet backing, make sure to take off only the white of the old damper felt. I suggest you order the damper felts with the scarlet backing.
You can order damper felts from our Online Catalog.
When you glue on the new felt damper pieces, be sure to note any graduation in size of the new felts. Put the largest felts on the first bass damper on the left, and work to the top of the scale or damper range. Use Elmer's carpenter's glue. If you are using stitched damper felts, make sure the flat side of the felt piece is glued to the wood molding, and the stitched side of the felt piece is against the piano string.
Be sure the felt pieces are lined up parallel with the sides of the damper wooden molding and centered so that they do not hang out on either side. Let them dry. Try to lay them in some way so that the felt piece will not twist or move as they dry.
It is time to return the dampers to the piano.
There is a guide board the damper wire goes through on its way down into the action. I neglected to add this to the diagram above. Be sure not to damage the small round felt bushing in the guide board as you insert the damper wires back into place. A drop of dry lubricant or aerosol silicone on each red bushing would be in order, but only a small amount.
Check the board at Part 14 to see if it has come loose or moved. If so, tighten the screws which hold it in place. If you are not sure where it should be, set it, after all damper wires are back tight into Part 17, so that the board stops the underlever before the underlever can tap against anything in the area above it. This board prevents the underlever clacking against wood and making noise. But, do not set it so that the key lever is inhibited from its normal movement upward. You will have to guess at this. If Part 14 is tight, DO NOT touch it.
You will have to get into the action cavity again, and help each wire into the hole in the top of Part 17. Once the damper is in place, tighten the set screw, Part 18. The screw will sometimes cause the wire to rotate as you finish tightening it. You may have to try a couple of times until the damper up on the strings is exactly parallel with the strings and with the damper next to it. Do not try to adjust the damper by rotating it up at the wood damper molding. You will loosen the damper wooden head on the drop wire, which is a small disaster.
Now, here is a very important matter. You will need to put the action back in without seeing if you have left enough room for the underlevers to clear the back end of the key levers. With the new felt on the dampers, this should not be a problem because the dampers are now sitting higher. But, to be sure you do not jam the back end of the key lever into the underlever, lift all the dampers up and roll pencils or some such object under the damper felts to hold them up as you install the action.
Install the action back into the piano as in Chapter Five. Without finishing the installation, make sure the action is in position by setting the guides under (or embedded in) the end blocks beside the ley action up front. If your piano does not use this method, finish installing the action to the point that your piano's positioning hardware is in place.
Remove the objects you used to hold the dampers up, and let them come to rest on the strings. If they all set nicely down on the strings, all is well so far. Play the piano to see if the dampers raise up enough to sustain. This could be anywhere from 1/4 inch to almost 1/2 inch. If the key levers resist and don't want to play or strike properly, the board at Part 14 may be adjusted too low. You will need to remove the action and raise it.
If the dampers do not sit down on the strings, you will have to remove the action, and drop the wires down deeper into Part 17. If only a few dampers are not damping, make a note of that and only drop those wires deeper into Part 17. After playing the piano for a few days or weeks, you may find that some ringing on takes place with certain notes. This means you will then need to drop the wires of the ringing on dampers deeper into Part 17.
When you put on new dampers, it is not uncommon for the new felt to be fluffy and not damp as suddenly as desirable. This will be solved in a few days as the new felt compresses and settles into the strings. Do not meddle with the felt until it has had time to settle.
What about the problem when the dampers do not raise enough off of the strings? In this case, you need to remove the action and get back inside and adjust the wire upward in Part 17 accordingly. Or, you may see it as lowering Part 17 so that there is more throw. Same thing.
Are the dampers bouncing high before they come to rest? Part 14, the stop board for the underlever, is too high. You should drop it down a bit to restrain the throw of the underlever. But, you want to err on the side of leaning Part 14 too high, NOT too low.
As I said, this is tedious work, but for the generally mechanical person, the logic of each step is not difficult. It IS important to ponder each step of the way so that you don't jam up things or make extra work for yourself later. If you are unsure of yourself, you may want to finish the task up to the point of gluing the damper felt on, and then ask your tuner / technician to come and install the dampers and make any adjustments.
![]()
![]()
![]()
![]()