| STORE
HOURS 9 TO 6 CDT GMT minus 5 hours Monday thru Friday Do not call on Sat. Sun. please |
| 6.
Bridge And Agraffe Repair You have examined the bass bridge, and you found that the pins have been drawn out of their hole and the wood is ruptured around the bridge pins. Wires may be buzzing, and the voice of the bass wires is very quiet. Here are two very different solutions: Temporary
Repair-Pin under wire: You will need the tool kit for both the temporary of permanent repairs. Cut a number of pieces of small nails. Get down under the key board. Work a small screw driver under each wire along the bridge where there is damage, and slip a nail piece under each wire as in B in the DIAGRAM. Next, examine the bridge to see if it is broken away from the sound board or the mounting board. If so, turn a small thin screw into the crack where it is separated at E in the diagram. This may not be true of both ends of the bridge. Now, with the tuning lever or hammer, tune the wires as suggested later in this chapter, sub-title, Tuning- Touching up twangs. This repair is strictly temporary, and you should tell your tuner about it BEFORE his next visit so that he can plan in time to make a proper repair. Permanent
Repair- Bridge and pins:
You will need the tool kit in the Parts Catalogue to do this job right. This repair is in the reverse order from the temporary. Examine the bridge. Is it clear that the bridge has shifted? You can tell this by the line where it originally sat. If it has moved, tap it back into place with a small hammer. Next, I want you to get a slow speed drill. Also get 4 or 5 counter sunk wood screws of medium size. The length is determined this way. Measure the stack of wood pieces of the bridge and the one or two pieces under it. The sound board, A in the diagram, is five eights of an inch thick. I want the screws to be exactly the length of all the wood in height. You
will have to loosen several wires, F, [ DIAGRAM ] to
make room for the screws that go through the bridge and into the sound board,
A in the diagram. You will need three drills per hole. Move the wires you loosened
to the side by hooking them over the pins next to them. Drill four or five counter
sinks in the bridge, C in the diagram, the size of the head of the screws. Drill
these so that the screw heads will be BELOW the level of the bridge so that the
wires will not slide over the screws after you put the wires back.
Next, the hole in the bridge must be the size of the shank of the screw. The threads must bite only the lower piece of wood and the sound board. Drill out these holes in the bridge only. Now, selecting a drill just under the size of the threaded section of the screws, drill on through the one or two pieces of wood, C, under the bridge, BUT DO NOT DRILL ANY GUIDE HOLE INTO THE SOUND BOARD. The sound board is spruce, and your screw will make its own hole and bite better without a guide hole into the sound board. If you are uncertain of yourself, get a bit with a stop to control your depth. Insert your screws and snug them down. I do not use glue at this point since that is too final. Do not put the wires back yet. In the diagram you will see that I want you to put more holes in the wood foundation piece for the bridge at D Use the same technique you used to put screws through the bridge, putting in three or four screws evenly spaced.. Depth of the counter sinking is not as important here. The screws also must obviously be much shorter. If you see that there is definitely NO separation of this piece of wood from the sound board, forget these holes. After all holes are drilled, put the wires back. Make sure the wires zig zag past the bridge pins like thee ones you didn't remove. Tune the wires using the sub-title in this chapter, Tuning- Touching up Twangs. Where you moved both wires in a note, or a single wire note, you will have to try to listen for the beats in the octave or just try to get it as close as you can. If there is serious damage in the pin area, that is, the wood around the pins has ruptured, but pieces of small nails under the wires, B in the diagram, lifting the wires with a small screw driver. You should have gotten back nearly all the sound that the piano can deliver in the bass. This repair, properly done, is able to make the bridge very nearly as good as new, and the repair will out live you. If you strip out the hole when you tighten a screw, fill the hole half its diameter with toothpicks and Elmer's carpenter's glue, and reset the screws. Do not tighten the wires until it has dried.
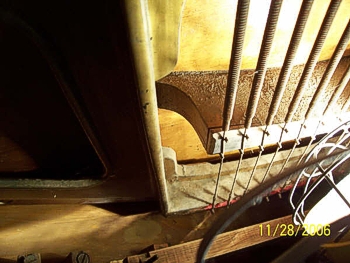
Here is a question you will run into. Look at the offset mounting board between the bridge and the sound board. The arrows point to the cracks in this offset board. You do not need to repair these cracks if they really are cracks, but you should carefully check to see if they hint at the bridge separating from the offset board, which is deadly in quieting the sound. The top arrows point to cracks in the offset board. This offset does not come all the way under the bridge in most pianos. The offset board you see has another board about two inches thick under its top edge, and the bridge is actually on the lower edge of the offset which is hanging out in space. This is done to get the sound to enter the sound board away from the edge where it will be retained better and spread through the whole board. The offset board can also break loose from the sound board and let all the bearing off. It can break away from the two inch board under it, or the two inch board under it can break away from the sound board. This is deadly since sound is lost badly from not being able to travel from the strings into the sound board across the open area generated by the loose offset board. On the other hand, there are brands of pianos where they made the offset board with cuts up to one eighth of an inch wide. They will follow the grain, as do the cracks, so you may be puzzled at first to determine if they are cracks or are there on purpose. If they are designed into the part, they will be somewhat wide from being cut with a saw. Again, either way, do not repair these cracks as seen in the graphic, but you may have to reattach the bridge better as instructed on this page. Also, and we have not covered this elsewhere, you may have to reattach the offset boards to the sound board by screwing through the two offset board where it sits on top of the two inch board glued to the sound board. If they are loose, you lose sound badly as the bearing is lost. You will need to loosen ALL the bass strings in about three tension reducing steps so that the bridge area is loose and the strings not bearing down on the bridge at all. DO NOT remove the the strings from the bridge pins. Next, you will have to attach the offset boards to the sound board. Work glue into the space between the offset boards and the sound board. You may want to drill quarter inch holes all the way through the offset boards and the sound board, and simply bolt the three together solidly with a nut and bolt with washers. Drill your holes about an inch from the upper edge of the offset board. There is so little wood here, and the tension is very great from the strings pushing against the bridge, that the spruce sound board probably will not hold the thing again by using a wood screw. Use bolts with washers, maybe brass to look a bit more esthetic, and cut off the excess bolt if possible. Be sure the bolts do not come into contact with the heavy wood frame of the piano behind the sound board. Put through a bolt about every six inches at least. You will add weight to the sound board, but that is far less serious than the loss of sound from a detached offset boards. Tighten the strings and tune them to the rest of the scale. You should order our CD to learn how to tune the piano since it will be hard to get it right without using some proper tuning theory. After adding most of the tension back to the strings, use a dull straight bit screw driver and tap the strings down into place where they cross the top of the bridge at the bridge pins.
Top
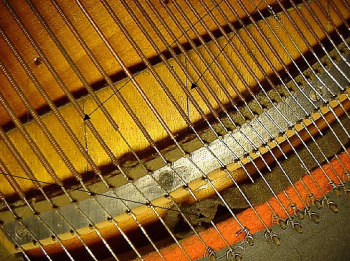
Secret: Restore Sound When Bridge Pins are Ruptured in the Wood Now, here is one that I have developed. This one will be useful to the most experienced tuner. First, this is for the family heirloom that is precious but not intrinsically valuable. You just want it to sound good again. If you have a Steinway in a professional setting, a bad bridge must simply be replaced. Order from your tuner or send me E-Mail for suggestions. This repair is for a bridge where all the bridge pins are trashed, and the wires are rattling and the sound is dull at best. Head for the welding shop, and get a length of eighth inch brass welding rod longer than the bass bridge. On the way, buy 12 brass counter sink wood screws about a half inch long. If the bridge is loose, make the repair described above screwing it down solid. Pull all the loose bridge pins out, and put them into a Gerber's baby food jar for future reference. Store the jar in a safe place (which means you will never see it again). Note the diagram please. Cut the welding rod to the length of the bridge, and bend it to the curve of the bridge if the bridge is curved. Start at either end of the bridge where you have room, and start lifting the wires with a screw driver and slide the brass rod along under the wires at the point of B in the diagram. If some of the bridge pins are still sound, leave them alone. Position the brass rod between the two rows of bridge pins. Now, drill two rows of holes on either side of the brass rod centering the holes between the wires. Make sure that every hole is right across from the hole opposite it on the other side of the brass rod. These are guide holes for the brass screws. You don't want the guide holes to be too small since you will be screwing into hard wood! Tighten the screws into the holes until the taper of the counter sink of the screw grabs the brass rod on either side pinching and anchoring it well. If you still have some rattling, pull out ALL the bridge pins that are left. I got 100% of the sound back in one piano with this method, and the bill was $700 less than another tuner's estimate. Help yourself. You can do these repairs on a grand piano, but remember that your work will be up there where the world can examine it. Work very deliberately in that case, and the result can look quite acceptable. If you plan to keep the grand though, it would be smart to order the new bridge from your tuner, and save up some coins to make the professional repair. The Bridge broke- We're talking about the long bridge that goes from the top right to the lower left. It broke right in the middle. Leave it right there. If you try to pull it back together, it will probably break somewhere else. A couple of screws through it into the sound board in the order of the previous repair would be useful. If bridge pins are ruined, run a short rod across the break as in the last repair. You can also buy "agraffe" repairs which go under the strings and hold the strings in place and carry the sound through to the sound board. See out Catalog-- Action Parts.
Agraffe Repair
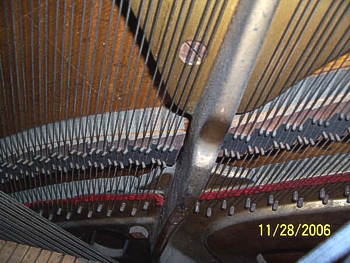
This is a bass string note in the photo. The following steps will need to be taken no matter where the agraffe broke on the piano: PARTS NEEDED: An agraffe for each one broken. Agraffe washers. A 36 thread "Easy Out." Possibly a tap to clean out the threads 1. Remove the strings from the piano by loosening the tuning pins. Take the winding off the pins by carefully removing the right angled piece inserted in the hole in the tuning pin. The string may break at this point, in which case a new string will be needed. 2. Now, it may be possible to remove the agraffe from the string by twisting it around the winding, but I have never heard how anyone has done this except on a single wire bass note. Getting the old wire back and screwing in the agraffe seems totally impossible to consider. The best plan may be to simply order new strings when you order the agraffe. 3. If a treble string is involved, you will be dealing with a three hole agraffe, and you will have to loosen a pin in the note to the right or left of the one where the agraffe broke. This is because the treble strings make a trip from one tuning pin down around the hitch pin and back to the next tuning pin. 4. If a single string bass note is involved, you may be able to work the agraffe through the winding once you remove it from the tuning pin. The problem with this trick is that you have to screw in the agraffe while you flip the string around and around. It may be done, but it is a bit insane. 5. Now, you need to remove the piece that broke off and is embedded in the harp of the piano. You may be able to tap it out with a pointed punch by tapping the outer edge of one one side of the piece in a counter clockwise direction, then tap on the outer edge of the other side of the piece in the same direction. This will probably not work. In this case, you will need to drill a hole in the broken piece into which you can insert an "Easy Out," and remove it that way. An auto mechanic can tell you how this is done and may loan you the tool. If not, we can supply the "Easy Out." Be sure to drill the hole in the exact center of the broken piece, and be sure the hole is not big enough to damage the threads of the piece. On a Steinway, the hole must not be over 1/8 inch, and on other pianos use the same rule. Steinway agraffes are a bit larger than other brands. 6. If the threads are damaged, you should clean them up with a tap which you can buy from our catalog. Thread the new agraffe into the hole. If it does not stop with a slight tightening in a perfect position perpendicular to the string pattern, you need to add the agraffe washers which we supply until the agraffe is positioned correctly. Do not leave the agraffe loose in the hole. Use the washers made of brass. 7. String the new wire as in our instructions.
See our catalog for Agraffes and associated hardware See abrasive cord for polishing Agraffe Holes
|